
Key Takeaways:
- A pressure switch monitors air tank pressure and automatically starts and stops your compressor to maintain desired pressure levels.
- The most common cause of pressure switch leaks is a cracked or worn diaphragm, which allows pressurized air to escape.
- You can test your pressure switch yourself with an ohmmeter and a separate air source or call a professional if you’re unsure.
- When replacing your pressure switch, make sure to carefully look at the electrical load and pressure maximums.
The air compressor pressure switch measures the pressure inside your air tank and shuts off your compressor when it reaches the air pressure you need.
The air compressor pressure switch will also help your machinery maintain the proper pressure level as you go about your work. The switch can turn on your compressor when tank air pressure levels drop and more air is needed.
This makes your air compressor pressure switch a part that gets used often, and so it may wear down sooner than others. You’ll want to keep it properly maintained and fix it, or replace it when any problems arise. The switch is your best protection against an over-pressurized tank and air lines for your compressor, keeping you safe from ruptures and dangers.
So, let’s discuss what an air compressor pressure switch is and how it works for you.
How Does an Air Compressor Pressure Switch Work?
Air compressor pressure switches use air lines to monitor pressurized air as it moves to and from your air tank. All pressure switches have an element that reacts when pressure is applied to it. The most common device is a diaphragm that will deform or compress when exposed to pressurized air.
Air pressure in your compressor tank will increase and eventually build up enough backward pressure — also called cut-out pressure — to change the shape of this diaphragm. Deformation here will cause movement in the pressure switch.
When your air compressor pressure switch’s diaphragm is deformed enough, its movement will break contact inside the switch so that power stops flowing to the compressor’s motor circuit, preventing the compressor from further pressurizing the air in your tank.
Constant air pressure at a specific volume will keep the diaphragm deformed. When the air pressure in your tank drops far enough, the membrane will revert back to its normal shape. Once this pressure — called cut-in pressure — lightens to a certain level, an internal operator within the diaphragm will deform in an opposite manner. This movement closes the circuit and starts the motor back up again.
Your air compressor pressure switch continues this dance as long as your machinery is using compressed air. The cycle is broken when the unit is no longer powered externally or when there is an issue. Leaks at any point in your compressor’s pressure switch and nearby casing can stop your work and cause major problems.
What Does Your Switch Look Like?
Pressure switches will often look like a small rectangular housing about the size of your palm. The housing may be plain or have its own switch that allows for multiple positions such as “auto” functions.
The switch is usually mounted on the reservoir so the air in the air tank can flow freely to the switch. Your pressure switch will monitor the air coming from this compressor tank, so you know how much pressure you’re using and can determine if there is an issue.
Compressed air will push equally in every direction and on all sides of the switch at the same time, so damage to the housing or the reservoir can cause a problem in getting correct readings.
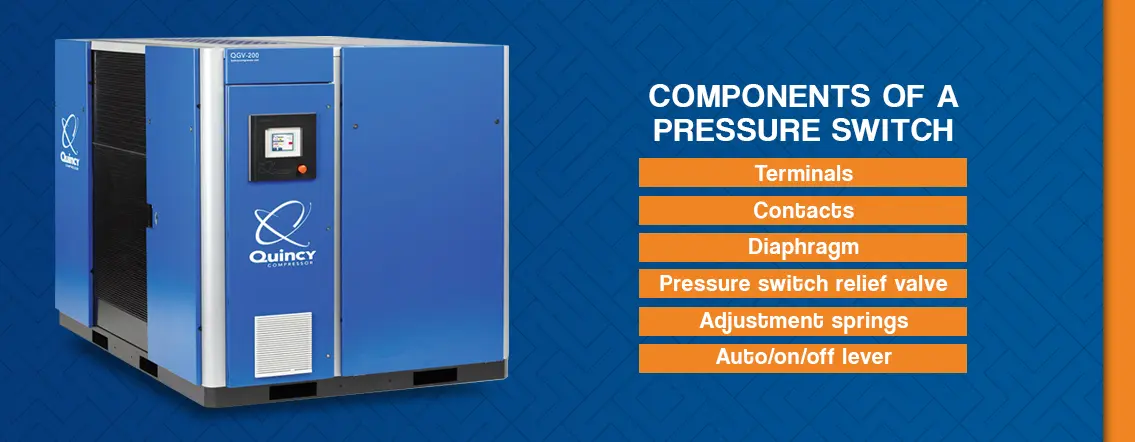
Components of a Pressure Switch
While there are a few different designs for air compressor switches, the typical switch has six components:
- Terminals: The pressure switch completes or breaks an electric circuit, thus telling the air compressor when to turn on. The incoming and outgoing wiring is connected through the terminals to the pressure switch.
- Contacts: The contacts are two points in the pressure switch which separate and come together to complete or break the circuit. They are made of a conductive metal, and when the contacts are separated, and the circuit is interrupted, the motor of the air compressor will shut off.
- Diaphragm: Also called a membrane, a diaphragm is a piece of flexible material that moves when the pressure inside the air tank changes. When the pressure increases, the air pushes against this membrane. When the desired pressure is reached, it pulls the conductive contact points apart, breaking the circuit.
- Pressure switch relief valve: This safety valve is designed to relieve pressure trapped between the pump and the check valve. It can be found on the base of the pressure switch control, where it’s connected to the check valve with a nylon or copper tube. The valve is activated when the contacts separate.
- Adjustment springs: You can adjust the cut-in and cut-out points for the air compressor with a spring. When you tighten the spring, more pressure needs to be applied from the diaphragm before the spring forces the contacts apart. When you loosen the spring, it will move with less pressure.
- Auto/on/off lever: Some pressure valves have an auto/off or on/off knob or lever to control the pressure switch. When it is on the “auto” or “on” setting, it will work with the determined cut-in and cut-out settings to determine when the motor turns on and off. When it is off, a piece of plastic becomes wedged between the contacts, keeping the power to the engine off.
Checking Your Air Compressor Pressure Switch
You can easily test your own air compressor pressure switch with an ohmmeter and a separate air source. Proper testing can save you a lot of time and headaches on air compressor switch repair:
- Start the testing process by unplugging your air compressor.
- Next, unscrew and remove the housing from your unit.
- Disconnect the sets of wires running between your pressure switch and the terminal block. These wires are typically blue or brown.
- Be sure to leave the black-and-white wires connected. These power the switch and can be difficult to replace or may cause problems later if you disconnect them.
- Locate the valve and apply air to your pressure switch. Be sure to use a source that delivers more air pressure than the switch’s current setting. If you’re not using enough pressure, the switch won’t engage.
- After air is applied to the switch, place the leads of your ohmmeter on each of the loose wires.
- If the ohmmeter reads “0,” then the switch is closed due to the pressure and your switch is in proper working order.
- Your ohmmeter may read open, “OL” or infinity, which means there may be an issue.
- Adjust the pressure switch’s set point by turning the set-point screw counter-clockwise. Apply pressure as you do this and look for the loop to close and the ohmmeter to read “0.”
- If your meter reading remains open even when the screw is completely disengaged, the switch needs to be replaced.
This process will differ slightly for some units, particularly in industrial environments. You’ll have some specialized requirements for testing and adjusting the set point, but the overall elements are the same.
Concerned about the process? Contact a Quincy Compressor service rep to get help testing or have your entire compressor serviced.

Changing the Pressure Settings
Your pressure switch is designed to cut-in when the pressure in the tank is lower than desired, and cut-out when the pressure you need has been reached. To reach the pressure you need for the desired application, you need to set the cut-out point to the corresponding pressure. You do this by moving the adjustment spring.
When you compress the adjustment spring, it requires more force from the diaphragm to move the contacts. When you decompress the spring, it is easier to move and will activate with less force from the diaphragm. You can adjust the tension in the spring by turning a long screw attached to the spring. When you rotate counter-clockwise, the spring decompresses, thus lowering the cut-out pressure. When you turn the screw clockwise, the spring compresses, raising the cut-out pressure.
Air Compressor Switch Leaking and Repair
Compressor switches often end up leaking after a long life of use. Thankfully, you’ll find that the most common cause for switch leakage is something you can check and fix.
Over time, the diaphragm inside the air compressor pressure switch can crack or get a hole worn in it. When this occurs, air will blow around and leak from the tank, moving through the diaphragm and out of any opening in the switch housing.
This is likely the scenario you’re facing if you notice leaks coming from odd areas such as electric wire ports and mounting elements. Sometimes you will need to remove the cover from the switch to look for leaks, especially if the area near the aperture is filled with wire strain-relief fittings.
When your switch’s unloader valve is located on the outside of the housing, this is the first place to look for leaks. Air leaking from this valve or near its connection to the cover will usually indicate a hole or other problem with the diaphragm.
These types of leaks can be difficult to resolve for many people. Sometimes problems occur with getting the proper diaphragm replacement. Customers have also noted concerns with parts or new issues after they’ve disassembled and reassembled their air compressor pressure switch.
Depending on cost, you might be able to save money and effort by replacing the pressure switch. Purchase a new switch, and you can expect a longer life from your air compressor because you’re getting a new diaphragm, points and other parts that tend to wear down over time.
Learning About the Unloader Valve
Concerned you may be having an issue with the unloader valve and experiencing air compressor pressure switch leakage? Let’s look at the unloader valve itself and see what its leaks may look like.
The unloader valve is a needle valve that monitors your pressure switch and responds to the pressure switch’s movements. It activates and is opened when the compressor motor shuts off, creating that telltale hiss present in any properly working air compressor.
The unloader valve opens and allows compressor air located around the compressor’s piston to escape to keep everything in proper working order.
You can tell air is leaking from this valve when the hiss lasts for more than a few seconds or if you can feel a steady stream of compressed air at the bottom of the valve. Sometimes these unloader valves just need to be cleaned, though a major crack or distortion means they’ll need to be replaced.
Breaking the Duty Cycle
Some air compressors will have a 100 percent duty cycle that means they can be used continuously and not overheat. These heavy-duty models are designed to prevent motor damage through constant use. Other compressor systems will have a limited duty cycle, so that prolonged use may cause harm to the unit.
Not adhering to a limited duty cycle can cause significant overheating and damage to your air compressor. The damage not only threatens the motor, but the heat can lead to an air compressor pressure switch leaking if friction is caused or the heat generated is localized near your pressure switch.
This type of issue often occurs when workers are using two compressors with a single compressor tank. That dynamic changes the workload on each compressor. If you’re running this setup and aren’t sure how to adjust operations or swap compressors, reach out to us today to make sure you’re not at risk of a major equipment failure.
Replacing Your Air Compressor Pressure Switch
The most common method of air compressor pressure switch repair is actually replacing the unit.
Picking the right air compressor pressure switch starts with learning the pressure requirements of your air compressor. Perhaps most important is to find the manual and determine the cut-in pressure range. Your new switch should operate at the lowest cut-in pressure value in your range to prevent damage.
Aim a little higher for the cut-in pressure, setting your unit 5 psi to 10 psi higher than the requirement to keep everything running smoothly. This buffer will give your air compressor enough time to start working and catch up.
There are also some other elements you should carefully look at when getting a replacement pressure switch:
- Electrical load: Make sure your new pressure switch can handle motor currents if you’re using a smaller compressor. If you’re unsure about the requirement, look to your manual or contact our staff for assistance.
- Pressure maximums: Compressors are rated for a specific max pressure. Make sure your new switch is rated for that pressure or higher. Also, be careful to never set a pressure setting higher than your compressor or switch can handle.
- The “on” switch: Does your current pressure switch have an on/off switch? Not all do; some have the switch located on a separate panel. Your replacement needs to match your original in terms of switches.
- Connectors: There are many adapters available for pressure switches and their connectors, but it is best not to use one if you can avoid it. Staying with the same connection removes potential leak areas and can make future maintenance easier.
These are just a few of the elements central to your air compressor pressure switch. Matching your new switch as closely as possible to the older switch is always your best bet unless an upgrade has been made available.
In most compressors, replacing the switch is straightforward. This is a general process, and your steps may vary, but it is standard for air compressor pressure switch repair:
- Unplug the compressor, so you don’t run the risk of shocking yourself or getting a nasty burst of pressurized air.
- Open the drain valve at the bottom of your tank to depressurize it.
- Locate the unloader valve and remove the line — typically ¼ inch — going to it.
- Remove the quick-connect compression fitting, pressure regulator and top gauge from the pressure switch. You’ll either have to use a small pipe wrench or a set of slip-joint pliers to get these off. Start by loosening the nut attached to the unloader valve’s air line, and pull this up out of its fitting.
- Disconnect the ground, neutral and hot wiring from your pressure switch.
- Grip the strain relief eyelet with your pliers or leverage it with your wrench to take out the cord.
- Pull up and remove the old switch.
- Apply a thread lubricant or pipe dope to the pipe threads and plumbing parts.
- Install the replacement switch by spinning it on.
- Using your wrench, tighten the switch. You may need to hold the lower stub pipe on the tank with pliers for better stability.
- Reassemble your plumbing parts and valves.
That is the basic set of steps to replacing your pressure switch and unloader valve. Advanced compressors may have larger systems that are more complex and require a broader set of tools and parts to successfully replace your air compressor pressure switch and other parts.
Air Compressor Pressure Switch FAQs
How Do I Adjust an Air Compressor Pressure Switch?
Begin by turning off the compressor and unplugging it for safety. Remove the switch cover and locate the adjustment screws. The larger screw typically sets the cut-out pressure, while the smaller screw sets the differential or cut-in pressure. Turn the screws slowly, testing the compressor between adjustments to ensure it reaches the desired pressures. Proper pressure switch adjustment ensures the compressor maintains a steady supply of air for end-use equipment without overworking the motor.
How Do I Know If My Air Compressor Switch Is Bad?
Signs of a faulty air compressor pressure switch include the compressor not starting, running continuously without shutting off or failing to produce the rated pressure. Other indicators may include unusual clicks or erratic operation. If you notice any of these symptoms, it’s important to inspect the switch and consider replacement to prevent damage to the compressor or connected tools.
Are All Air Compressor Pressure Switches the Same?
No. Differences can include voltage ratings, cut-in/cut-out pressure ranges and mounting designs. Always match the replacement switch to the compressor’s specifications. Using the wrong switch can prevent your compressor from producing consistent airflow or even cause damage.
How Do I Tell Which Pressure Switch I Need?
The correct pressure switch depends on the compressor model and the intended application. Check the user manual or the existing switch for specifications, including voltage, cut-in/cut-out pressure and compatibility with your compressor type.
Why Is My Air Compressor Leaking Air From the Pressure Switch?
Air leaks from the pressure switch are often caused by a worn or damaged diaphragm, loose fittings or excessive pressure beyond the switch’s design. Inspect the switch for signs of wear, tighten fittings and verify the pressure settings. Replacing a compromised switch with a correctly rated component can restore proper operation.

When You Should Call a Professional
Sometimes a pressure switch leaks air when there is another problem in your system. One common cause comes from the unloader valve itself. If your unloader valve is leaking, you may want to reach out to a professional for a full inspection and repair.
To tell if your issue is from the unloader valve, we’ll check for a leak when the air compressor is off. This type of leak means you’re looking at a problem with the valve as well as the compressor tank’s check valve. Problems can include failures in the valve to close, improper sealing, or even damage and cracks to one of these parts.
In this case and with leaking due to wear over time, it can be difficult to get the parts you need for your air compressor pressure switch. Reach out to our professional staff for a quick check if you’re finding it tough to get parts or aren’t sure what parts you need.
Let’s say you tried to fix it yourself, and you’re still experiencing air compressor pressure switch leaking. Don’t just assume your new pressure switch is faulty. The tank check valve, unloader valve and other elements may be responsible for your woes.
Contact Quincy Compressor for your air compressor and pressure switch repair so you can get your work completed on time and on budget.