
In regions where snow and ice are part of the winter season, air compressors are used in various ways for leisure, work, winterizing and safety. We’ve described some popular ways to use an air compressor for DIY projects and provided a wide range of applications that compressors are used for in an industrial setting. In this article, we’ll go over the many ways air compressors are used in the winter. Whether it’s improving safety on our roads, helping out with fun activities or making maintenance tasks a breeze, air compressors are there as a dependable power source.
One of the biggest jobs in the winter is moving snow. Snow removal with an air compressor isn’t as commonly thought of, but there are a few ways that compressed air makes easy work of some of the trickier methods of removing snow. Moving it off the driveway, out of the way of solar panels and out of the way of endangering people are easy tasks that can be done quickly and efficiently with the power of an air compressor.

Contact Us Learn More Find a Dealer Near You
Safety-Conscious, Extreme Compressed Air
The most extreme power of compressed air can be seen in the design of the Arctic Air Snow Removal System that is used to remove snow from the top of trailers, buses and other high vehicles. The system isn’t available quite yet, but their product has been designed to simulate the force of air that occurs when the rig is moving at high speed, forcing off piles of snow and ice. Removing snow from the tops of trailers has long been a challenge in the trucking industry, and a variety of products have been made to solve the problem of snow flying off transport trucks while in transit.
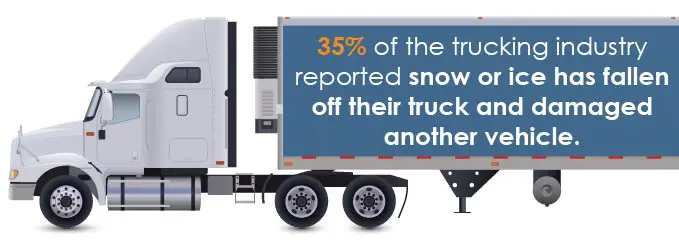
In a 2006 study, 35% of respondents in the trucking industry reported snow or ice has fallen off their truck and damaged another vehicle. The Arctic Air Snow Removal System will work to alleviate this issue, with a design composed of thick piping that would extend up the side of a trailer and over the top, forcing out compressed air at 100 psi on a 45-degree angle to push the snow off the side. The ideal setup would have the “snow blower” mounted on a skid to be easily moved by a forklift and an electric-eye motion detector to start and stop the 49-hp diesel compressor. While these devices will certainly find a home in many trucking terminals, they will also be beneficial in rest areas, bus yards and rail yards.
Minor Snow Removal With an Air Compressor
Using your air compressor to remove snow at home is also a possibility. Smaller home compressors won’t have the power to move much more than a light dusting, but those with solar panels will find the reach of pressurized air an easier way to get some of those hard-to-reach panels. A small tank you can carry will have enough compressed air for a small array, but if you’ve got a stationary unit with a long air line, you can blow off a good amount of snow from a larger solar panel array. And while you’ve got that air power out, you can also blow away the snow on your car, driveway, walkways and anywhere else you can travel with your compressor and air line.

Bursts of Air for Automation
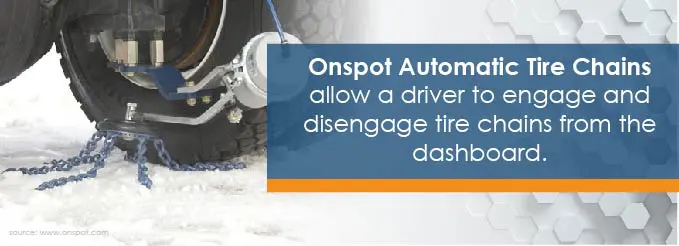
Compressed air is used for power in all sorts of ways. The applications that incorporate the use of pressurized air in small bursts to activate a device seem to be endless. One example of this is the Onspot Automatic Tire Chain, which allows a driver to engage and disengage tire chains from the dashboard. Traction is a regular concern when the winter weather hits. These automatic tire chains are permanently mounted on the vehicle’s frame rail and connected to an electric switch installed in the cab. The compressed air comes from the vehicle’s onboard air system in the case of trucks equipped with air brakes or from a 12-volt compressed air kit that can be installed along with the tire chain system.
This technology is a great example of the usefulness of compressed air in any capacity. When the switch is flipped on the dashboard, the compressed air enters the air chamber by the opening solenoid, and the chainwheel is lowered. Once a chain makes contact with the inside of the tire, the friction created between the tire and rubber-covered chainwheel makes the chainwheel rotate and forces the chains to the front of the tire. The six chains are spaced at 60-degree intervals with two chains always between the road and the tire.
With compressed air coming to the aid of another winter trucking challenge, team drivers Bob and Linda Caffee share a common situation that the Onspot Chains make safer and easier. When pulling into a rest area or customer’s property, you can be met with a sheet of ice or snow that has not yet been plowed. “…we deploy our chains and we have traction,” said the Caffees. “With the chains deployed we have the traction needed to keep from sliding off the beaten path or possibly into a solid object…”
Ice Chillers to Keep Ice Solid
We’ve covered some really important air compressor applications for safety and efficiency in work, but there’s quite a few ways that an air compressor is working to help out with play. Playing on ice is one of the ways that we can actually look forward to the cold season. Even if you don’t care to venture on the ice yourself, you have likely enjoyed watching some hockey games or figure skating. Since ice is mostly a hazard and hindrance in the winter, we’ll gladly highlight the positive nature of ice. Creating that big slab of ice to skate on is all worth it, whether it’s for recreation at your local arena, for NHL games in major rinks or for the family backyard rink.

Unfortunately, most outdoor rinks depend on steady freezing temperatures to keep the ice in good skating shape — unless you are using an ice rink chiller. They are much like large flat refrigerators and are the reason some outdoor rinks can still be used well into the warmer days of spring. Ice rink chilling works much like your refrigerator does.
- Chilled pipes under the skating surface have salt water moving through them in a low-pressure gaseous state that transfers the cold to the pipes, and then to the ice.
- The compressor is at the other end of the refrigeration system, taking the refrigerant that has “warmed up” through its cycle in the piping.
- The ice rink refrigerant is compressed, which increases the temperature of the refrigerant. Then it passes through pressurized coil piping to release the heat into the open air.
- As the refrigerant travels from the open-air pressurized piping to the chilled piping under the skating rink, the change from high pressure to low pressure causes it to change into a gas form again. This rapid evaporation drops the temperature of the refrigerant well below freezing and enables it to “pull” more warmth from the ice as it does another trek through the under-ice piping.
For the backyard rink, there are portable options that allow the homeowner to set up and take down the tubing and chiller to be stored for the summer. There are also more permanent rinks that embed the piping in concrete. For the summer, the concrete pad can still be used for a variety of other uses like a ball hockey rink, basketball court or spacious patio spot.
Ice making for an arena follows a similar process of refrigeration, but on a much larger and colder scale. Most NHL rinks use ethylene glycol as the refrigerant for its lower freezing point, which is pumped into around 55,000 feet of steel piping embedded in concrete. Water is sprayed onto the freezing concrete to make the ice, which can be solid within 24 hours with a 375 hp compressor. This type of system is used for major sports rinks like Madison Square Garden in New York.
The Act of Decompression for Making Snow
If you’ve been to a ski hill, you may have seen several big machines churning out some fresh powder. While the weather may not always cooperate with adequate levels of precipitation to coat the slopes, with cold enough temperatures, expanding compressed air is the perfect source to turn water into snow. On the ski hills or in your own backyard, the science of snow-making can be implemented with a purchased snow-making machine or your own DIY model.

The Science of Snow-Making
Turning water into ice crystals, also known as snow, is the basic function of a snowmaker. The main focus is cooling the water very quickly. This is adequately achieved with the act of compressing air, then expanding it.
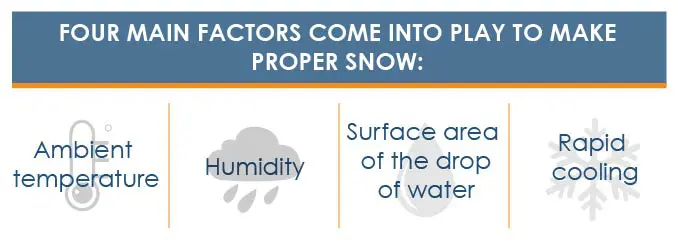
Four main factors come into play to make proper snow:
Snow-making is a fun science experiment and can be observed by running a purchased snow machine or embracing the full realm of snow-making by constructing a snow gun yourself. With the apparatus to combine the cold air and water, a pressure washer and an air compressor, you’re all set to let it snow.
There’s quite an in-depth science to snow-making, and if you think you’d like to increase your snow cover, you may find it interesting to know about the heat exchange that needs to occur, the difference between homogeneous and heterogeneous nucleation and the importance of the water droplet size. For our purposes, we’ll give you the quick summary as it pertains to the four factors noted above.
Ambient Temperature
The quality of snow is highly dependent on the outside temperature. Snow can still be slushy when it’s below freezing (32° F, 0° C). The ideal temperature for making quality snow is 28° F (-2° C) or lower, and that’s dependent on how much humidity is in the air.
Humidity
The combination of the actual temperature and the humidity in the air is called the wet bulb temperature, and it’s the most important indicator of ideal snow-making conditions. This measurement takes into account the cooling effect the level of humidity will allow. Since the moisture in the air will impede the ability of the water to evaporate away some of its heat, the lower the moisture level or humidity, the better snow can be made at slightly higher temperatures. If humidity is low and the wet bulb temperature is in the low- to mid-20s, snow can be made at — or even a couple of degrees above — freezing.
Surface Area of a Drop of Water
As partly explained above, the more exposure each drop of water has to the cold and dry air, the easier it will be turned into snow. The nozzle of your pressure washer will be important to your snow-making efforts. The size of the drops, the space between the drops and the volume of water flowing from the nozzle will all be important factors that create the proper distance and hang time to make that mist into snow.
Rapid Cooling
When air is compressed, it increases in temperature. Naturally, when it is expanded again, it decreases in temperature. This is why an air compressor is so great for making snow. With the right combination of air and water in your snowmaker, the water can immediately freeze into ice crystals that result in snow falling out of the mist.
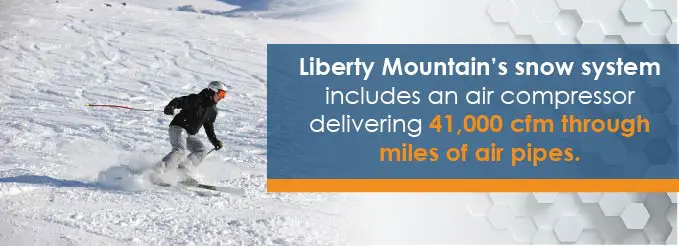
Snow-making in your backyard can be achieved with an air compressor that delivers at least 60 psi and 5 cfm. Snow-making at ski resorts requires a slightly bigger system. Liberty Mountain Resort describes their snow-making system, which includes an air compressor delivering 41,000 cfm through miles of air pipes along with water pipes that pump an average of 4,700 gpm of water. They estimate they can make about 1,300 tons of snow in an hour with their system.
Easier Winterizing With Your Air Compressor
Getting ready for the colder temperatures of winter happens in various ways. Whether it’s getting your vehicle equipped with snow tires, refreshing some weather stripping around your doors or completing maintenance tasks with seasonal equipment, everyone has a few tasks to mark the change of seasons. Winterizing systems and equipment with your air compressor is an efficient and quick way to clear out all water that may be lingering in lines and piping.
Avoiding damage from freezing water is a big part of winterizing. Your RV, boat and sprinkler system all need to be completely cleaned out of water before the winter freeze hits. Here’s your step-by-step guide to winterizing your sprinkler system:
- Set the compressor to a maximum of 50 psi, if your irrigation system uses the flexible black polyethylene piping, or 80 psi for the rigid PVC piping.
- Be sure your water supply is turned off, and set the timer to open just one zone.
- If your system is equipped with a manual drain valve, open that valve for the first zone to be cleared.
- Turn off the two valves on the backflow preventer and screw in the quick connect coupling to the blow-out port of your system, and snap on the air hose to the quick-connect.
- Work through each zone one by one. Turn on your compressor to blow out the line. The heads of that zone should pop up and spit out water.
- As soon as the line runs dry, stop the air flow to prevent damage to the plastic gears.
- After going through all the zones once, go back and blow each zone again.
Depending on what the cubic feet per minute (cfm) rating is for your air compressor, you may not have enough power to blow out your system, even by taking it zone by zone. You can determine the amount of cfm required to blow out each zone of your irrigation system if you have the irrigation layout indicating the gallons per minute (gpm) of each sprinkler head. Divide the gpm of each zone by 7.5, which will give you the cfm rating you’ll need for an air compressor to adequately blow out the piping. If you’re unsure of the gpm of your system, you can rent a 10 cfm compressor from your local tool rental company that will provide the needed volume of air for any home irrigation system.
Having your own compressor can make an easy job of essential work around your home. Quick filling of tires, power for air tools and easy cleaning of parts are just a few of the other common DIY projects that air compressors are great for. Even if you have to rent one for some of the big jobs, you will still save yourself some money by doing it yourself and avoiding the higher bill from a company coming in to winterize your sprinkler system for you.

Taking Care of Your Air Compressor in the Winter
Maintaining your household air system throughout the year should be a semiannual task, with winterizing your air compressor being a time of inspection, repair and cleaning. With some regular attention, you can keep your system running efficiently, avoiding downtime at the most inconvenient times.
Through servicing, weatherizing and optimizing heat recovery, you’ll have a high-functioning and low cost air compressor. Here’s a brief rundown of each of these vital air compressor winterizing steps.
Servicing
Your household air system is likely running in some capacity all year long, which makes a twice a year check-in a top priority. Your checks and cleaning should include:
- Inspecting the system drains for obstructions
- Testing for leaks and repairing even the most minor of issues — before it becomes a major breakdown
- Checking filters, dryers and receivers for proper flow
- Cleaning or replacing air filters
Weatherizing
The low temperatures will have a negative effect on the efficiency of your system. Making sure that heat stays in and cold stays out will help you save money and will benefit the integrity of your air compressor. Be sure to make these inspections of:
- Weather stripping, to notice indications that it needs to be replaced
- Insulation, to discover unnecessary heat loss
- Air intake drains and openings for cracks, wear and the need for replacement
Heat Recovery
Recycling the heat generated by your air compressor is an ideal way to have a high-efficiency system. By installing an air compressor heat recovery unit, you can reduce your energy costs and consumption. It’s estimated that about 90% of the energy consumed by an air compressor is converted into heat, and a heat recovery system can capture anywhere from 50-90% of this heat to be used for ambient indoor heating.

Air compressor are used for many different reasons — as a power source using the force of air to operate tools and machines, as a triggering factor for automation or for the chilling effects of the expansion of compressed air. At Quincy Compressor, we’ve been supplying the world with compressed air options for nearly a century. We’ve been at the forefront of new technology and have provided a wide range of options for the biggest industrial setup to the low-power needs of a home compressor. Contact your local Quincy Compressor sales and service representative to learn more about our products and legendary performance.
Contact Us Learn More Find a Dealer Near You